
The Next-Level Apparel Decorating Guide — Techniques, Tips, and Tutorials
From foundational skills to advanced processes, this updated guide delivers everything decorators need to elevate their craft.
In 2024, Apparelist launched "The Ultimate Guide to Apparel Decorating," which featured several different tutorials on all of the major decorating technologies being used in the industry. Hands-on education is a valuable way for new and even seasoned decorators to hone their skills.
Building on the momentum, we're updating this guide, bringing the apparel decorating community fresh tutorials on the technical decorating skills needed to be successful.
For any decorator, this is the ultimate guide that can be referenced again and again. We've even provided a tutorial to take you beyond apparel decorating and into the world of hard goods for even greater opportunities. Provided by some of the industry's most seasoned veterans, keep it on-hand to learn throughout the year.
Table of Contents
- Create Faux Leather Patches with HTV
- A Step-by-Step Guide to Vibrant, Durable DTF Production
- An Essential Guide to Testing and Troubleshooting Your Garments Before Screen Printing Production
- How to Create Beautiful Sublimated Slate Every Time
- Simple Embroidered-Edge Emblems: Beginning with Small Run and Sample Patches
- When (and How) to Pivot from DTG to DTF with a Hybrid Printer
Tutorial No. 1 - Create Faux Leather Patches with HTV


By Adam Sneath, communications specialist, Siser N.A.
Have you ever wanted to create your own leather patches, but the thought of working with leather, or even faux leather, was a bit too intimidating?
You’re not alone! While great for achieving a premium look, leather can be quite tricky to cut and stitch if it’s not a medium you work with often.
But what if there was a way to create patches that look like leather using only heat transfer vinyl (HTV) and a little something we like to call the “emboss method”? Keep reading, because this article is going to guide you through the process of creating your own faux leather patches.
Understanding the Emboss Method
Before creating your first faux leather patch, it’s important to understand the emboss method and what exactly that means in the world of HTV.
Simply put, the emboss method involves applying a layer of thick HTV (like Brick 600, for example) onto a garment, then applying a second layer of a thinner HTV (like EasyWeed EcoStretch or PureHT) on top.
After the second press, the thicker one will “push up” into the material layered on top, creating a nifty embossed effect … like what you see in the dad hat to the right.
Pretty cool, huh? If you want to see the emboss method in action, check out a video tutorial here.

But let’s get down to business: How does this relate to faux leather patches?
With a certain selection of three different HTVs, there’s a way to use the emboss method to create designs that look surprisingly like actual leather! Best of all, it’s super easy to make using just about any logo.
Let’s dive into the creative process from software to heat application.
Supplies Needed
First things first: You need the following supplies to create a faux leather patch:
- Design software
- A vinyl cutter
- A heat press (or hat press if applying onto a hat)
- A cotton, polyester, or cotton/poly blend substrate
- StripFlock Pro (any color) or equivalent
- Brick 600 (any color) or equivalent
- PureHT (Russet Brown)
- An EasyWeeder
- Some parchment paper
Once you have all the supplies, you can dive right in (scroll down for a video gallery of the steps).
Step One
Import your SVG design into the creative software of your choice. In this article, Leonardo Design Studio is used. Resize your design as desired.
Step Two
On the artboard, create an offset that’s a little bit bigger than your design. This offset will be cut twice and act as the “base” of the patch as well as the top layer.
In Leonardo Design Studio, you can create an offset by selecting the Build Contours Tool.
Step Three
Cut out the layers separately using your vinyl cutter. (You may need to separate the layers manually on your artboard if your design software doesn’t do it automatically.) For this tutorial, the Romeo High-Definition Cutter was used.
The layers should be cut with the corresponding materials:
- Design – Brick 600 (any color)
- Offset Shape – StripFlock Pro (any color)
- Offset Shape– PureHT (Russet Brown)
Step Four
Once all layers have been cut and weeded, it’s time to heat apply. Take your substrate (in this case, a hat) and place it on your heat press platen. Make sure your heat press is set to 311 F.
I’m using a hat press for simplicity, but you can also use a regular “flat platen” heat press as well. Just position the hat face-up toward the edge so that the bill doesn’t interfere with application. You may also want to stuff a small towel in the base of the hat to help get even pressure.
Step Five
Arrange the StripFlock Pro onto the hat, centered to the best of your ability. Cover with parchment paper and press for about 5 seconds, then wait for the HTV to cool a bit before peeling the carrier warm.
Step Six
Next, arrange the Brick 600 design on top of the StripFlock Pro. Cover with parchment paper again and press for 5-10 seconds. This is important: Allow the HTV to cool completely before peeling the carrier off (cold peel).
Step Seven
Lastly, arrange the PureHT over the entire design. Cover with parchment paper and press for 5 seconds, then go ahead and peel the carrier hot (just be careful!).
Step Eight
Cover the patch with parchment paper again and press one last time for 10-15 additional seconds.
Ta-da! You now have a faux leather patch that looks shockingly convincing. This method works great anywhere you want to add a little leather flair without using actual leather.
BONUS: Make a patch to be sewn or adhered later
But that’s not all! If you want to make a standalone patch so you can sew it or fabric-glue it onto a substrate later, we have a solution for you.
Simply cut an additional offset shape out of StripFlock Pro so that you have an additional base layer. Then instead of putting your substrate onto the heat press in Step 4, place one of the StripFlock shapes onto the platen with the adhesive side facing up. Arrange the second StripFlock shape on top of it with the adhesive side facing down, creating a “StripFlock sandwich.”

Press this “sandwich” for just 1 or 2 seconds, then allow it to cool before peeling the carriers. Now you can continue with the remaining steps to create your standalone patch.
You can use your standalone patch to be sewn onto a hat later, adhered to jeans using fabric glue, or even turned into fun keychains!
A Step-by-Step Guide to Vibrant, Durable DTF Production

By Mike Davis, Roland DGA application specialist
Many people have seen direct-to-film (DTF) printed products in the marketplace, but they may not be as familiar with how DTF designs are actually produced. In fact, DTF production is an easy-to-learn and easy-to-use production method. It requires minimal set up and can be done relatively quickly, making it cost-effective for both short and long runs. It also offers a lower entry cost when compared to some other apparel decorating methods.
In addition, DTF can be used on a variety of fabrics, including cotton, polyester, denim, nylon, rayon, and more, and is often used to customize T-shirts, hoodies, tote bags, and other fabric applications.

The DTF workflow is a quick and simple four-step process — one that requires no weeding or masking. Some manufacturers like Roland DGA offer a complete DTF solution including a printer, transfer film, powder, and inks (each sold separately), which can also be integrated with DTF powder shaker and heater units for an automated system.
Here, we’ll provide detail on each of the four primary steps in DTF production, aka “print, powder, press, and peel.”
Step One: Print your design using DTF inks onto transfer film.
To set up your printing, make sure you’ve designed your artwork in RGB color mode in high resolution (300 DPI) and have selected a transparent background (PNG) format.
Then, load your media and properly align it to ensure precise printing and cutting.

Next, prepare your graphic for output, either using design software or RIP software. Send your file to the printer, mirroring the image only if your RIP software doesn’t do that automatically. After the colors are printed using CMYK inks, white ink will be printed over the design as a base layer for transfer and opacity.
Note: Some DTF printer manufacturers, like Roland DGA, include design software that can facilitate easy design set up.
Step Two: Apply powder and heat
Next, apply the shaking powder over the design, either by hand or by using an automated shaker/heater unit. Then melt the powder under a heat press for the recommended time at the temperature recommended for the specific fabric you are using.
Note: If you are producing gang sheets for sale, this is where you stop. Gang sheets are a profitable way for printer owners to produce multiple designs on one sheet, which customers can cut out and apply to a wide variety of apparel at a later date.

Step Three: Heat press your design
To customize your apparel item, position your design on your garment or textile, and use a heat press to adhere your design onto the fabric, leaving the item and graphic in the heat press for the recommended time at the recommended temperature.

Step Four: Peel away the transfer film
Carefully peel the film away from your design and enjoy the results of your work! Remember, you can store your DTF transfer prints in a cool, dry location and apply them on-demand, saving inventory storage.

Equipment Investment Considerations
Each component of your DTF production equipment can affect the quality of your final product. It’s important to use a proven printer manufacturer and high-quality inks to achieve consistently rich, colorful, high-definition output.
Another factor to consider is the amount of DTF prints you anticipate producing. DTF printer manufacturers have responded to the increased demand for DTF production with printer options that can accommodate varying levels of production.
For example, Roland DG offers its desktop version, the VersaSTUDIO BY-20, for shops that are printing and transferring 50-75 shirts a day, and its TY-300 production printer for shops that are producing a larger volume of apparel or are looking to sell gang sheets. You can also opt to purchase an automated shaker/heater unit, which can simplify the powder application and melting process.
Lastly, if you are planning to apply designs to garments in-house and/or on-demand, you will need to have a heat press on hand.
Want to offer fast, low cost, high-quality customization and durable prints? DTF production is the answer many apparel decorators and customers are looking for. I hope this introduction is helpful as you examine your apparel decoration options to see if this modern technology is right for you and your business.
An Essential Guide to Testing and Troubleshooting Your Garments Before Screen Printing Production
By Ryan Moor, CEO/co-founder of Allmade
Screen printers manage enough already. The last thing you need is a new garment failing on press due to issues like dye migration, ghosting, poor discharge, or heat sensitivity. Here is a quick overview of four key decoration issues and how to handle them, along with guidance on where to find detailed recommendations for all other decoration concerns.
The below video outlines the testing guide; scroll down for the written guidelines.
Challenge One: Dye Migration in Polyester
Polyester is notorious for dye migration. When polyester is dyed and later exposed to heat during flashing or curing, the dye can activate and migrate into your ink. This turns bright inks muddy or discolored. However, not all polyester content is created equal, so knowing how to look and test your polyester dye migration performance is important.
How to evaluate polyester for dye migration:
- Check the garment fiber content.
- Identify whether the polyester is dyed and how dark it is.
- Remember that many heathers contain polyester that is not fully dyed, which often reduces or negates migration risk.
- Run a dye migration test. You can follow the step-by-step instructions at Madelab.io.
What to do with the results
- Severe migration risk (camo polyester, deep saturated colors): Use a full blocker base.
- Moderate migration risk: Use a low-bleed ink.
- Low or no migration risk: Use cotton white, HSA, or water-based ink for better hand feel and easier printing.
Challenge Two: Ghosting on Sensitive Fabrics
Ghosting occurs when hot stacked garments cause the dye in the shirt to react with the ink on the shirt beneath it. This creates a faint, reversed impression of your design on the back of another garment.
How to avoid ghosting:
- Avoid unnecessary use of low-bleed or poly inks.
- Use cotton white when the garment does not require low-bleed ink.
- Avoid hot stacking when printing on ghost-prone fabrics.
- Let shirts cool before stacking if you must run low-bleed ink.
Knowing whether your garment actually needs a low-bleed ink is one of the biggest ways to avoid ghosting entirely.


Challenge 3: Heat Sensitivity and Fabric Discoloration
Some fabrics change color or scorch when exposed to high heat. This includes certain synthetic fabrics and natural cellulose fibers such as modal or rayon.
How to control heat discoloration:
- Follow garment-specific decoration recommendations from the manufacturer.
- Avoid sending garments through the dryer or under a heat press at overly high temperatures.
- Adjust flash times to reduce surface temperature.
- Test small samples before running production.
- If you are heat pressing, use low-cure transfers to lower the transfer temp needed.
Where to Find Detailed Decoration Recommendations
Allmade has complete decoration guides that cover: dye migration ratings, discharge ratings, heat sensitivity notes, ink system recommendations, cure temperature guidelines, what to use, what to avoid, and more for screen print decoration, heat transfer decoration, direct-to-film (DTF) decoration, and direct-to-garment (DTG) decoration.
Made Lab also posts practical testing guides and example results at Madelab.io.
Testing is always the best practice. Running a few prints, checking temperature, and evaluating how a garment behaves before you begin production can save hours of rework and hundreds of dollars in wasted shirts.
If a shirt darkens, shifts color, or develops a halo around the print, heat was likely the cause.
Challenge Four: Discharge Print Variability
Discharge ink interacts with the garment dye, removing dye and replacing it with your chosen pigment. Since every dye reacts differently, discharge performance varies widely by color and blend.
Key discharge facts:
- Natural fibers discharge.
- Synthetic fibers do not.
- Blues and other colors, even on cotton, often discharge poorly.
- Garment blends produce mixed results as only some of the fiber is discharging.
How to prepare:
- Review discharge ratings published by Allmade.
- Run a small discharge test swatch before production.
- Confirm whether a garment is fully compatible before you commit to the technique.
How to Create Beautiful Sublimated Slate Every Time

By Cheryl Kuchek, founder of Sublimation Summit
If you've been in the sublimation world for any length of time, you already know that not all substrates are equal. Some are easy to press, and others are a bit of a challenge. I would put slate in the latter category.
What is amazing about slate is that when finished, it is stunning to look at and has a high-perceived value. Slate is unique and sells for a premium. As an apparel decorator, leaping into the world of hard goods only leads to more profit. Learn to master slate, and you'll be offering something most of your competitors aren’t able to deliver.
I can't begin to tell you how many times someone has messaged me on Facebook saying, "Cheryl, what am I doing wrong? My slate looks dull or cloudy; my colors bled or ghosted."
Trust me, I've been there. I've wasted more pieces of slate than I care to admit when I was first learning. But here's the good news: Once you understand what slate needs and what works against it, you'll create gorgeous pieces that people will pay top dollar for.
Understanding What Makes Slate Different
Slate isn't like your typical sublimation blanks. When you buy quality slate from a reputable vendor, the coated surface should look and feel perfectly smooth, like a mug or hardboard. But here's the difference: Underneath that polymer coating, you're still working with natural stone, and stone behaves differently from other substrates.
Here is something that took me way too long to figure out: Slate is a naturally porous stone that absorbs moisture. Depending on where you live and how humid it is, that slate is sitting there soaking up moisture like a sponge. Even if it looks and feels completely dry to the touch, there's water hiding in that stone. I cannot tell you how many pieces I've ruined before I realized the impact that moisture was having on them.
When you apply heat to slate with trapped moisture, that water turns to steam and pushes right through your design, leaving you with splotchy, uneven images that make you want to throw not just the ruined slate away, but all the ones you have as well. Ask me how I know.
So, how do we deal with this moisture problem? That's where my pressing method comes in, and I'll walk you through exactly how to do it. But first, let's talk about the equipment you need.

Now here's the secret weapon that most people try to skip; you need either a green sponge heat pad or a Nomex felt pad. These are game changers for slate. They sit between your heat press platen and the slate, conforming to the uneven natural surface and ensuring consistent heat and pressure distribution across the entire piece, including stubborn edges.
I use the Nomex felt pad, but plenty of people swear by the green sponge pad. Both work beautifully. The key is choosing the one that works best for you. Without it, you're going to fight those uneven edges every single time.
And speaking of edges, here's something you need to know if you haven't worked with slate before: Slate blanks come with naturally rough, uneven edges. This is part of the charm of natural stone, but it also means you need the right padding to get full coverage.
Setting Yourself Up for Success: Prep Work
When preparing your design for slate, be sure to account for those uneven edges. You don't want the part of your design intended for the slate to end up on the sides, or to have part white sides and part sublimated. Don't forget to mirror your image before printing!
Clean your slate thoroughly before you do anything else. Use a lint-free cloth and make sure there's not a speck of dust anywhere. Even the tiniest piece of debris will appear in your final product as a white spot on an area where the ink didn't transfer.
Have your heat press ready for the slate before you turn on the heat. What I mean is that I put my Nomex pad down, along with the parchment paper, the slate, and another parchment piece on top of the slate. I am setting it up for proper pressure. I want firm, but not too hard, when I close the heat press. I typically do medium to hard pressure. Once I have that set, I turn on my heat press to 390 F and leave the Nomex pad on to start getting warmed up.
Place your printed image under the closed heat press and let it warm the paper for about 10 seconds to drive out any moisture. When you're taping down your design, be generous with the tape. Tape down close to the four corners and along the edges if needed. The reason I prefer tape over repositionable spray is that I like to peek at the finished product to make sure it has the finished look I am going after. If not, I can add another 30 seconds without the paper shifting and possibly ghosting. Usually, that is all it takes for that luster to come through.
Ready to Press: The Face-Down Method
Now that the heat press is set at the correct temperature, I add seven minutes and 30 seconds. After it reaches the temperature, I close the lid to heat up my Nomex pad, usually for two or three minutes. Now it's ready for my taped-up slate.
With heat gloves on, I place a piece of parchment paper down, then my slate face down on the Nomex pad with the image face up. Notice that it's the opposite of how we typically sublimate an item: the image is usually face down. Then I place another piece of parchment paper on top.
I press it for seven minutes. Once that's finished, I flip it face up then press for an additional 30 seconds. I find that doing this gives me the sharpness I want without overcooking it.
Pressing the slate face down is the key to solving that moisture problem I told you about earlier. By pressing the coated slate face down, the moisture escapes from the uncoated back of the slate while the heat transfers your design. We're giving that trapped moisture somewhere to go, rather than pushing it through your image.
Every time I do slate, I get that WOW factor. You know the one. That moment when you peel back the paper, and the colors just pop off that stone. Have your heat gloves ready and your cooling rack nearby. Carefully peel back the tape while the slate is still warm. This is the moment of truth. Watch as your design reveals itself with those rich, vibrant colors and that beautiful glossy finish that makes slate so special. This is what all that prep work was for.
Let it cool completely on your cooling rack before handling it too much. I bought my cooling rack from Dollar Tree. No need to spend a fortune on every tool.
My Sublimation Sandwich:
- Nomex pad
- Parchment paper
- Slate (coated side face down) with image (face up)
- Parchment paper on top
Quick Step-by-Step Reference
- Prep your slate: Clean thoroughly with a lint-free cloth.
- Mirror your image and print.
- Prep heat press for correct pressure (medium to heavy).
- Heat your press to 390 F.
- Warm the Nomex pad: Close the press for 2-3 minutes.
- Tape your design securely to the slate.
- Build your sandwich: parchment paper, slate (face down), image (face up), parchment paper.
- Press for 7 minutes.
- Flip and press face up for 30 seconds.
- Remove the tape while still warm, then let it cool completely on a cooling rack.
Note: Time and temperature settings may vary depending on your specific heat press brand and model. These settings work consistently for me, but you may need to adjust slightly for your equipment.
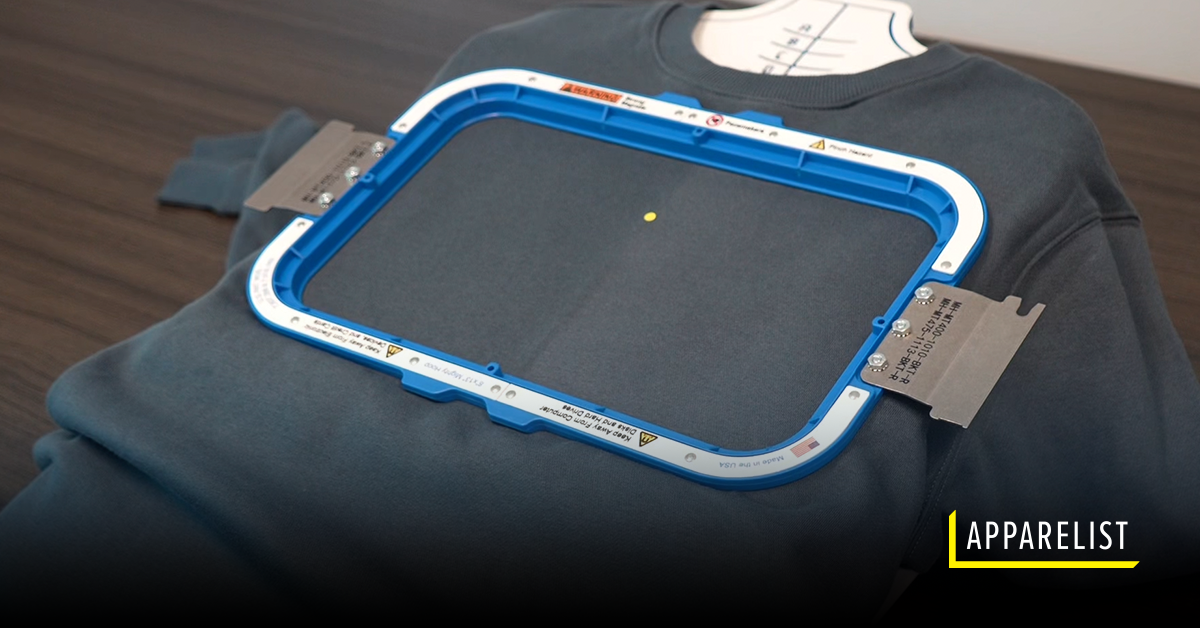
Simple Embroidered-Edge Emblems: Beginning with Small Run and Sample Patches
 (1)")
By Erich Campbell, Embroidery Digitizer/Educator Program Manager, Commercial Division of Briton Leap
Every embroiderer I’ve worked with eventually develops a desire to stitch patches. Whether I'm teaching at a tradeshow, hosting a livestream, or just talking shop with a few like-minded stitchers, the topic of creating clean-edged emblems without much more than a standard embroidery machine is sure to surface. Luckily, it’s not terribly hard to get started, even if there’s room to add refinement and complexity as you develop your skills and decide to invest in equipment.
Traditional vs. Embroidered Edge Patches
Traditional patches typically have their edge stitching applied after the patch is stitched and cut from a fabric span. This method necessitates the use of a Merrow machine, requiring patch-makers to manually guide each patch through the overlocking machine to achieve the classic wrapped edge. However, most embroiderers I encounter are eager to finish patches without the need for manual handling or additional equipment.
The methods below are not meant for mass production, so much as for those seeking to create a few patches on the fly or determined to edge a shape that cannot be run through an overlock machine.
Making embroidered-edge patches is a sensible choice for those who want a clean edge without the need for cutting and for whom outsourcing isn’t an option due to order size, complexity, or a need for creative options not offered by the large-scale emblem shops.
Fortunately, creating embroidered-edge patches and badges is not overly complicated. There are several methods that result in a clean-edged emblem. Moreover, some methods avoid the meticulous task of cutting around borders by utilizing readily available soluble and easily removed materials. By surrounding your design with a wide, full-density, satin-stitch-like edge (generally more than 3mm wide), you can even hand cut in-the-hoop, capturing the fibers in your patch material. This means that any embroiderer can create a small run or initial sample patch using only their machine and a pair of precise scissors.
With the right support materials, you can even make a free-standing, thread-only patch without the need for cutting fabric. The choice comes down to your customer’s needs and budget, the cost of your time vs. machine time, and how deeply you want to dive into additional equipment costs.
Seven Simple Steps to Stitching Patches on Removable Stabilizers
Patches are traditionally executed on materials that are smooth in texture and dimensionally stable, minimizing distortion during stitching, chief among them the classic polyester twill. The production steps using the materials covered in this guide are relatively consistent, so we’ll combine those that only vary slightly from each other into a simple set of steps. Let's explore these basics of the patch-making process and then delve into those variations that deviate from the standard steps.
You’ll need:
- A properly-prepared and threaded embroidery machine
- A digitized file prepared for patches
- Polyester twill or other base material (unless employing the thread-only patch method)
- Crinoline stiffener (if desired and/or if not already fused to your selected patch base material)
- Appropriate trimmers and scissors
- Plotter or laser cutter (for the pre-cut material method)
- Soluble or otherwise removable stabilizer, such as fibrous water-soluble stabilizer, heat-away polyolefin film, or a plastic substrate
- Adhesive or sealer as desired
- Heat press (for heat away substrates or applying heat-seal or adhesive)
Soluble/Removable Method - ‘One-Step Stitching’
Please reference the below photo gallery for images of the process.
Creating patches using easily removable or soluble stabilizers involves seven basic steps:
- Hoop the proper stabilizer or support material: To achieve a clean, thread-wrapped edge, you can use a water-soluble stabilizer that dissolves when washed/rinsed, a tear-away plastic film, or a polyolefin film that tears away and uses heat to remove any excess material. For more pliable patches that won’t be heat-sealed or applied with a thermoplastic adhesive, a fibrous water-soluble stabilizer may be preferred.
- Stitch a placement line: Create a line that indicates the placement of the patch material, whether it's pre-cut or will be cut manually or by laser within the hoop. This will determine where the patch material will be placed.
- Place the patch material: Carefully align the patch material with the placement stitching to cover the entire outline, making sure to properly orient any pre-cut shapes or to fully cover the area if cutting in-the-hoop. If the material shifts easily, secure it with a light spray of embroidery-specific adhesive.
- Stitch a tacking run: It’s common to use a zig-zag stitch to tack down the edge of pre-cut materials or one to three passes of a straight stitch for hand-cutting. The zig-zag tack-down should be thinned to fit under the final border, with the edge of any precut fabric just inside the zig-zag’s outer edge. The tacking run holds down the base patch material in both cases, but the multiple passes of straight stitching used for hand-cut patches create a clean, raised line against which you can “ride” your scissors.
- Run the central design material: Stitch the main decorative area of the patch, ensuring it runs before the border. The full-density border column has the highest chance of compromising the stabilizer and causing the patch to shift or "pop out." This step is particularly important when using film-like water-soluble stabilizers and plastic films. Stitching the central design is crucial if your design elements intentionally run under the final finished border. If using the hand-cut method, cut away excess material after this step. Be cautious when hand-cutting on weaker plastic films to avoid pulling, tearing, or cutting the film.
- Stitch the final border: Many digitizers use a satin stitch for the final border, although a faux merrowed or textured edge constructed with motifs or specialty software has gained popularity. Combining edge-walk underlay and double zig-zag underlay can provide satin borders with more body when manually constructing the edge.
- Release the span and remove excess stabilizer: Take the span out of the hoop and remove the excess stabilizer by washing/rinsing it for water-soluble stabilizers, tearing it away for plastic films, or tearing and heating it away for polyolefin films.
- If desired, apply a heat-applied sealer or thermoplastic adhesive layer, cutting it to shape either before or after application depending on your desired method.
Soluble Substrate Method - The Two-Step ‘Appliqué’ Method
This method allows embroiderers to stitch the heaviest area of their designs on a full fabric span so as to eliminate potential tearing or difficulties while using a second edge-finishing step on soluble or removable substrates to make clean edges easier to achieve than with post-cutting processes.
- Split your patch design into two files. One contains the central material and a “cut line” for each patch, and the second contains a placement line, tackdown stitch, and the final edge for each patch.
- Hoop an unbroken span of your patch base material, layered with any desired stiffener.
- Load up and stitch the central design area and cut line of your patch (or multiple patches if stitching more than one patch in a single span).
- Un-hoop your span and cut away the excess material from your patch(es).
- Hoop your soluble/removable substrate.
- Stitch placement line(s) showing where to place your pre-stitched “cuts.”
- Place your cuts in the placement lines, using a light embroidery adhesive to hold them in place on the span.
- Stitch the tackdown line to hold your cuts in place and verify their placement.
- Stitch your final finished border, covering the cut edges completely.
- Release the span of soluble material and remove excess appropriately as needed for the material as stated in the above steps.
- If desired, apply a heat-applied sealer or thermoplastic adhesive layer, cutting it to shape either before or after application depending on your desired method.
Thread-Only Patches


Thread-only patch making is a popular choice for its simplicity and the opportunity to create patches in any color available in your thread collection. This method involves a vastly higher stitch count but eliminates the need to pre- or post-cut a fabric patch.
To create such a thread-only patch, you can start with a span of non-soluble or polyolefin film as the base material. Some embroiderers use commercial systems with prepared sheets of plastic film, while others utilize a traditional hoop holding a span of 20-gauge clear vinyl or polyolefin film to achieve the same results.
Free-Standing Foundations
To build the body of a thread-only patch, digitizers create a three-layer underlay mesh with opposing angles underneath the main filled area of the patch design. This mesh, combined with the covering stitches, allows the thread to hold together, stay stable, and provide more "body" as a finished piece.
Home and craft embroiderers may recognize the main background underlay, which resembles the mesh-like support fills used in "free-standing lace" designs. While thread-only patches can be created using water-soluble stabilizers, the remaining material within patches using plastic or polyolefin substrates provides stability and stiffness that can be desirable in the thread-only patch.
To stitch a thread-only patch, hoop the film, run the background underlay and fill, move to the central design, and finish with the border as usual. Once complete, tear the patch out of the plastic or polyolefin film, and heat the edges of the latter to remove any excess material.
Post-Run Edge Cutting - Hot-Knife
Using a hot-knife is a common method employed by patch-makers to cut finished patches out of an unbroken span of material. Essentially a wood-burning pen, the hot-knife requires polyester or similar materials that melt and fuse cleanly. With hot-knife cutting, you can eliminate the need to cut the material before or after stitching, trading the secure, stable stitching experience for the need to hand-cut and finish the final edge.
To create a hot-knife patch, simply stitch the design, including the border, through the patch material. This requires no particular digitizing method, though some patch makers use a specific reinforced satin-stitch border meant to create a solid, dense edge for the hot-knife to follow.

After sewing, you can fuse the stitched span, consisting of multiple patches, to an adhesive or sealing layer. Place the finished, fused span on a smooth, heat-resistant surface such as a glass pane on a desk, and trace each patch carefully and smoothly against the border using the hot knife. This process melts through the patch material and adhesive, fusing the edges and separating each patch from the span.
Although some residual material may remain at the edges, this method not only saves you from the dreaded “pop out,” but also allows you to avoid any hand-cutting or hot peeling of adhesive layers the way you may have to do when preparing a pre-separated patch for heat press. Keep in mind that the increased manual work may make this method less attractive compared to using soluble or film methods, depending on the desired attachment method and materials the customer requires.
Post-Run Edge Cutting - Laser Cutting
For those with laser cutters, a similar process can be employed to cut finished patches from a suitable fabric span. The simplest methods pair camera-enabled laser cutters with either automatic or premade vector toolpaths to cut patches just outside their outer stitched edge. The process of placement and alignment may vary from machine to machine, but entails careful checking and adjustment of the cutter’s start position to the span of fabric. Once properly aligned, the laser cutter can quickly trace the edge of each patch, freeing it from the fabric.
When (and How) to Pivot from DTG to DTF with a Hybrid Printer
By Deana Iribe, Printer Biz/The Print Bakery
You've invested in the future of printing with a hybrid DTG/DTF machine, giving you unmatched versatility and flexibility. Now, the key is moving from knowing how to print with direct-to-garment (DTG) and direct-to-film (DTF), to knowing exactly when to choose one method over the other. Stop guessing! This comprehensive guide will equip you with the practical criteria to confidently select the more superior method for every order and supply you with the terminology to clearly and expertly advise your clients on the best solution for their needs.
Step One: Define the Differences Between DTG and DTF
To be able to make the right decision, we first need to clearly define the differences between the two printing methods.
DTG Printing: This process is exactly as it sounds. Ink is sprayed directly onto a garment (if dark then garment is pretreated), which is absorbed by the fabric, resulting in a print with an incredibly soft hand feel that is highly breathable. However, since the ink needs to be absorbed, it works best on natural fibers like 100% cotton.
DTF Printing: This is a transfer process. The design is first printed onto a coated PET film, then a powdered adhesive is applied and cured before being heat pressed onto the garment. The result is a vibrant print that sits on top of the fabric. You are able to transfer your design onto almost all natural and synthetic fabric types.
Here's an easy-to-read matrix:
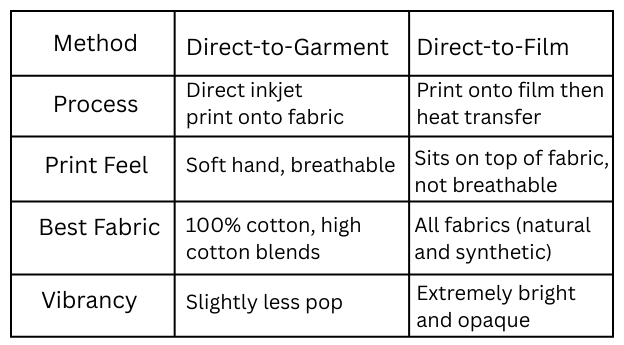
Understanding these differences is key to successfully choosing the right method for the job at hand.
Step Two: Ask and Listen – Determining Customer Needs
Before you start up your printer and heat press, the absolute next step in the decision process is to listen to your customer. Selecting DTG or DTF is dependent on the ability to fulfill the customer’s core requirements. Asking the right questions is also crucial in being able to quickly narrow down the correct printing method.
- What type of fabric do they want?
The material is the most significant factor.
- 100% Cotton or High Cotton Blends (80%+): This fabric is the native environment for DTG, which binds directly to natural fibers for the softest feel.
- Polyester, Tri-Blends, Nylon, Rayon, or Low Cotton Blends: These synthetic and mixed materials are prime candidates for DTF, as the film-based transfer adheres beautifully without fiber incompatibility issues.
- What is the desired hand feel?
How soft should the final print feel against the skin?
- Soft, Breathable, Integrated: If the customer prioritizes a print that you can barely feel, DTG is the clear winner because the ink absorbs into the fibers.
- Smooth, Vinyl-Like: If a clean, slightly thicker finish is acceptable — especially on items like uniforms or sportswear — DTF offers excellent durability and color opacity.
- What are the key design elements?
The ink coverage and style of the graphic can influence the best method.
- Feathered Edges, Drop Shadows, Outer Glows, Smoke Effects: DTG is the only print method that is capable of reproducing these design elements without the need to halftone. This method produces a more natural blended look onto the fabric.
- Crisp Lines, Fine Text, or Highly Saturated Solids: DTF excels at producing extremely sharp edges and highly opaque, vivid blocks of color that pop against dark backgrounds, particularly important for logos and vector graphics.
- Designs with Large, Solid Areas of ink: If the design features significant areas of ink coverage, DTG may be the preferred method due to its breathability. DTF is not breathable in these instances, and graphics of this nature can cause the print to stick to sweaty skin on a hot and sunny day.
- What is the wash/durability requirement?
How long and how often does the garment need to last?
- High Durability and Stretch: DTF typically offers superior stretch and better resistance to repeated washing cycles on fabrics due to the adhesive layer.
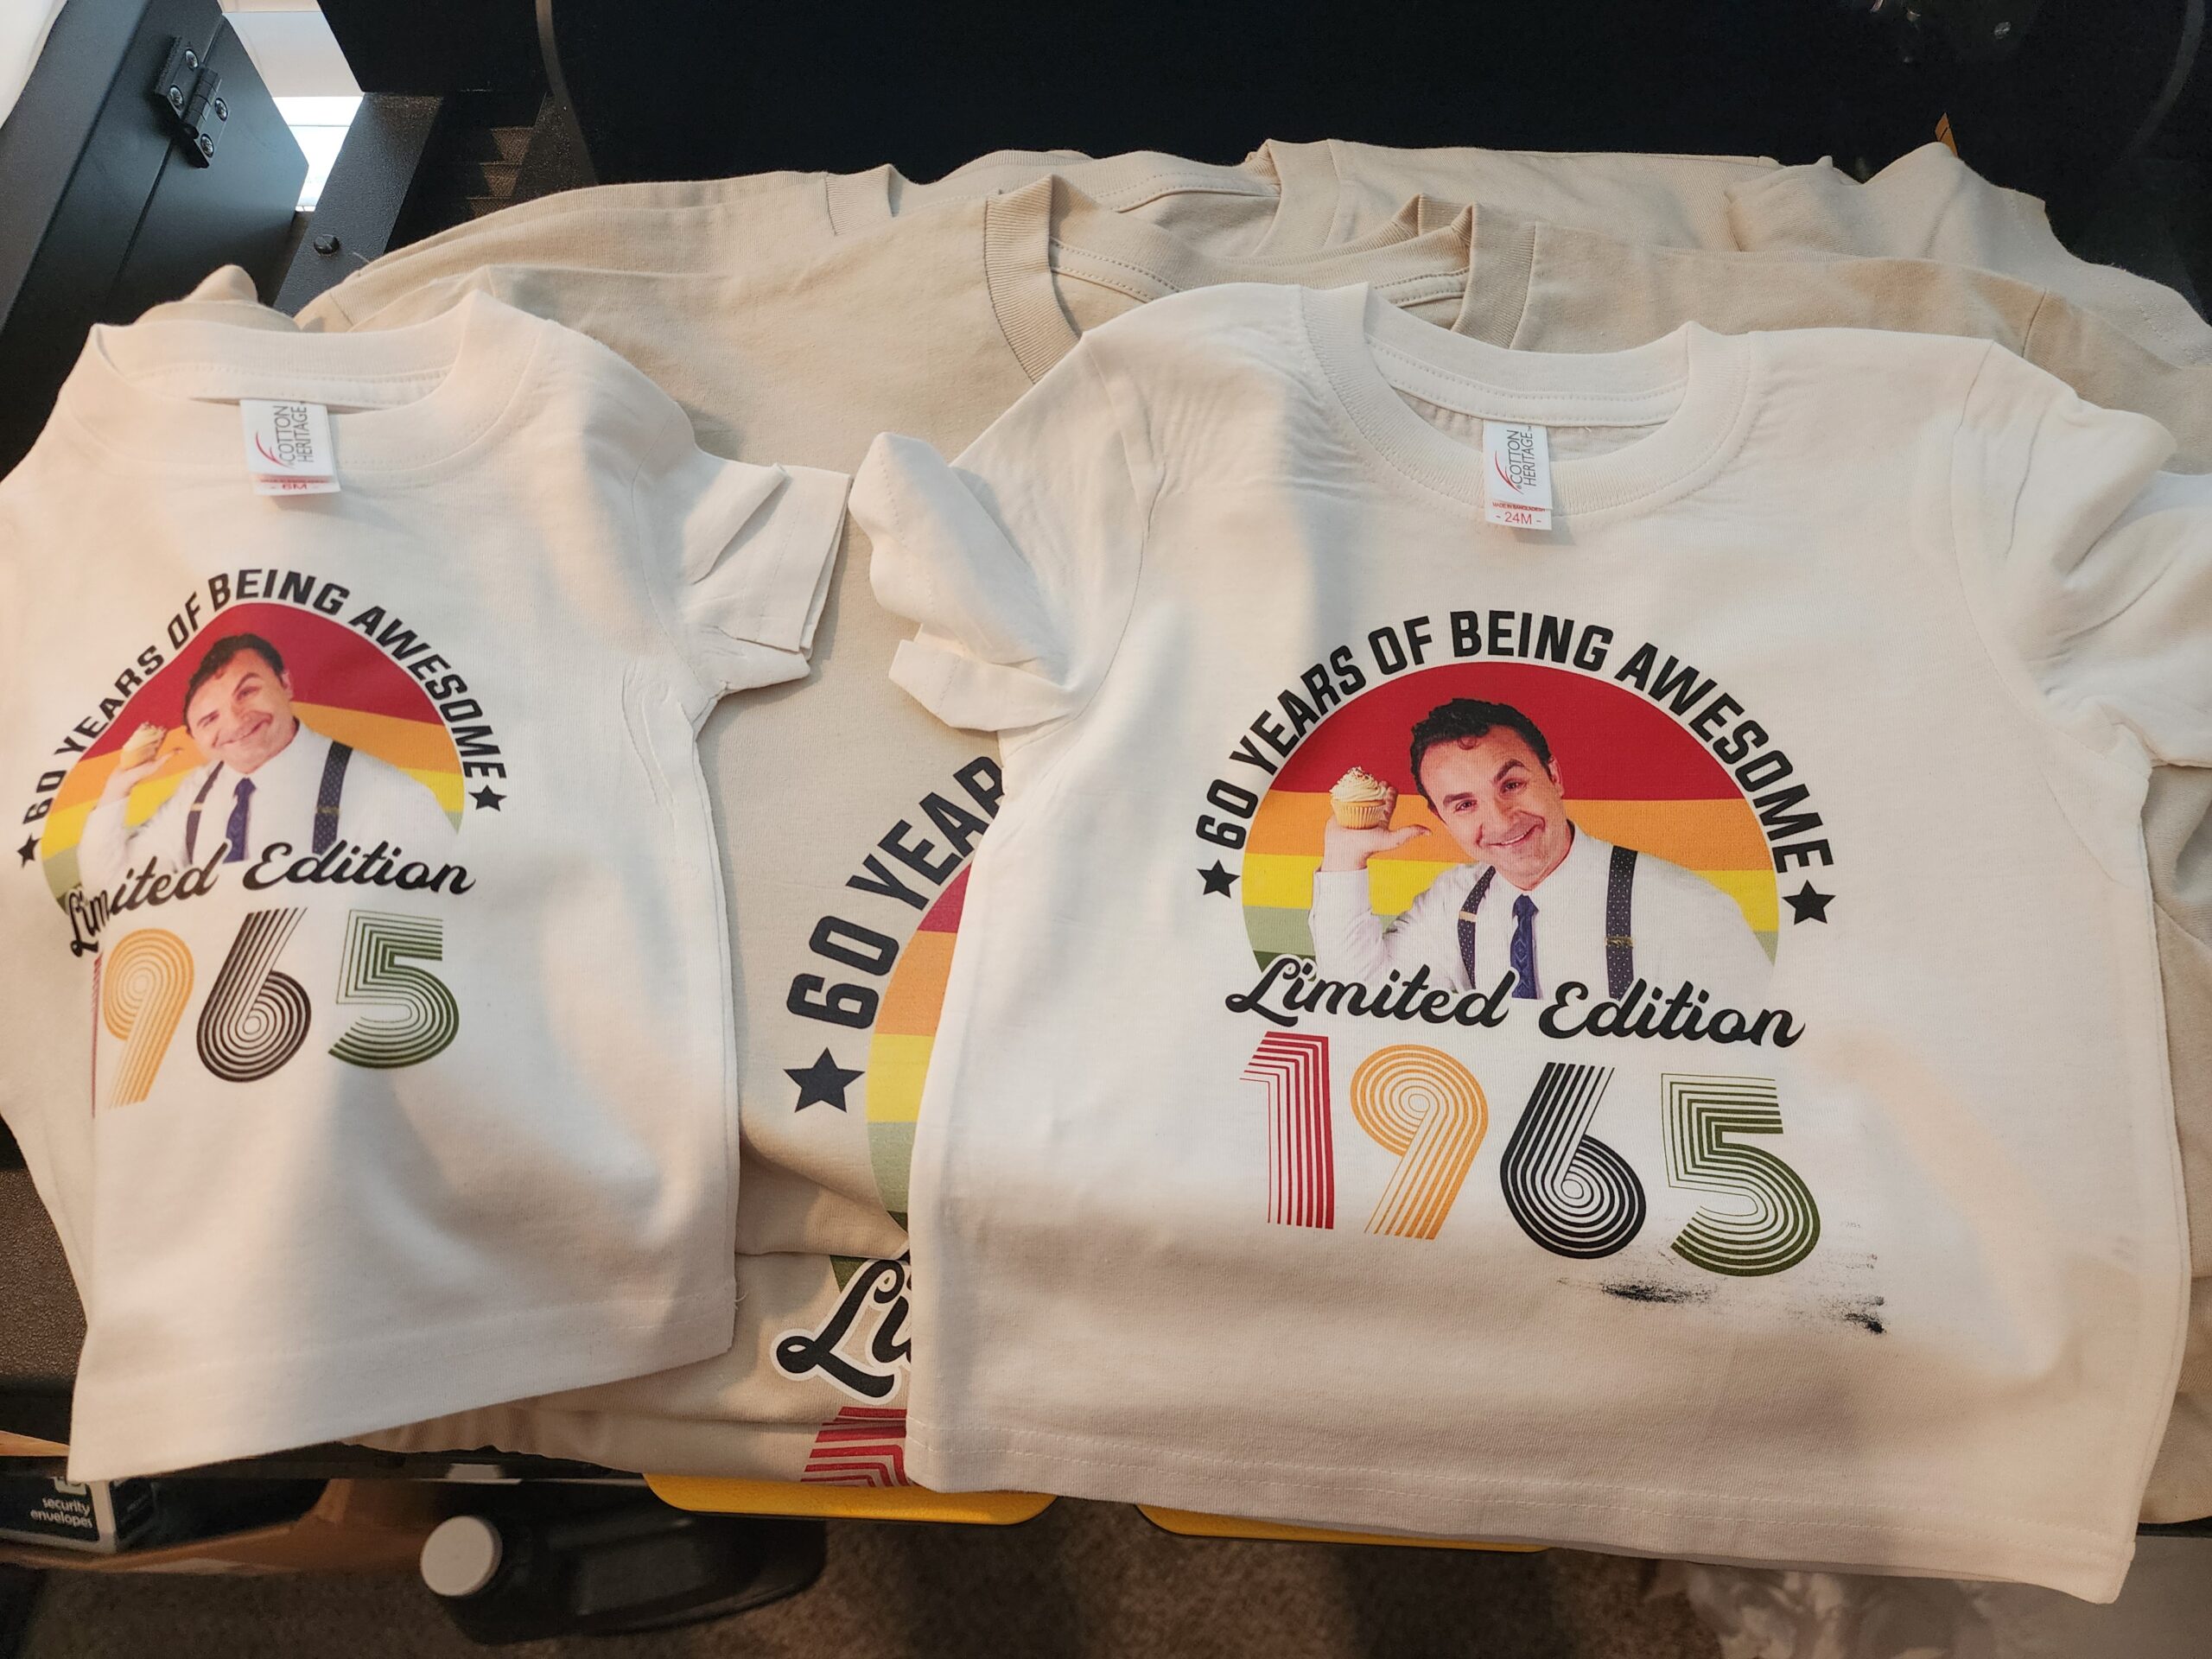
Credit: Deana Iribe
- Standard Wear: DTG prints (pictured above) are durable and hold up well to standardwashing, provided they are properly cured, especially on 100% cotton.
By immediately addressing these four factors with your customer, you move past indecision and create a clear, streamlined path to choosing the optimal print method.
Step Three: Guiding Customers to the Best Solution
It’s important to recognize that sometimes, the customer’s desired outcome may not align with the most effective or even feasible printing method for their specific garment or design. For example, a customer might request the soft feel of DTG for their large full-coverage design, but insists on using a black 100% polyester shirt, which is incompatible with DTG’s core chemistry.
This is where your expertise becomes invaluable. You can suggest to change the garment to a high-quality 100% cotton shirt, or explain that if they change their synthetic shirt color to white, then you can achieve the soft hand they are looking for.
By doing this, you are no longer just an order-taker — you’ve now become a consultant. When you educate the customer why DTF is right choice for polyester (durability, vibrancy, no dye migration) or why DTG is better for their 100% cotton, oversized artwork with feathered edges (soft hand, natural look), you end up building trust and help ensure their satisfaction.
Using the criteria from the previous step — fabric, feel, design, durability — you can confidently steer them in the right direction that guarantees a successful product.
Conclusion: Mastering Your Hybrid Printer
You are now equipped with the knowledge to choose between DTG and DTF for any order that comes your way. Remember, the true power of owning a hybrid printer is the ability to select what’s most optimal, not just what’s available.
Here are three key takeaways that summarize your new decision-making process:
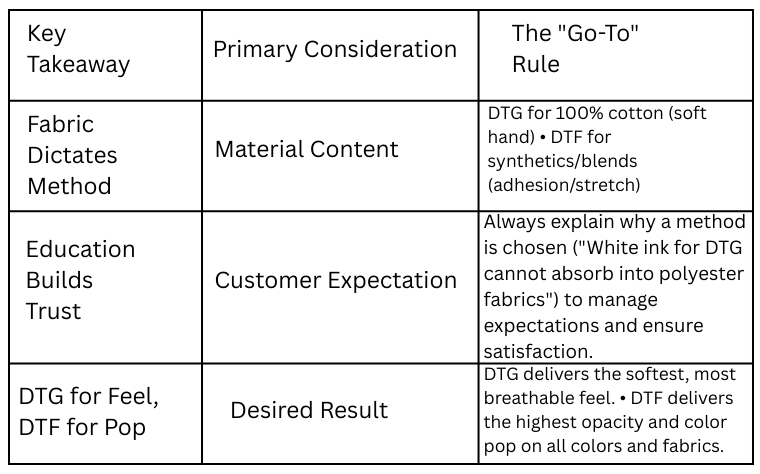
By asking the right questions upfront, understanding the differences and outputs of both methods, and knowing the pitfalls, you can utilize your hybrid printer as a profitable production tool.